I decided to take an old picture frame and repurpose it for jewelry. I purchased this one relatively cheaply at an antiques store:
While the gold frame didn't look bad per se, to have this be a re-hab project, I needed to do something to it. Plus, I had never (brace yourselves) used spray paint before and was excited to try it out. Here's a little gray primer...
...followed by black and a glossy top coat. I am now a spray paint addict - I love the beautiful results, not the fumes, so don't go all Intervention on me. Ugh I wish I had discovered this stuff when I was working on the Good House!
Then, the most challenging part! I had to cut a board from Dan's parents' garage to fit inside the frame. This was also my first time using a handheld saw like this! I was so nervous, I was sweating profusely. And while I probably should have been focusing on the task at hand, I could only think about if the sweat caused my hands to slip, therefore chopping off my arm, or worse yet, chopping off Dan's dad's arm (pictured - he held the board steady for me and kept reminding me to follow the line). I mean, what better way to express my gratitude for them letting me live here? Luckily, none of the aforementioned disasters actually happened. Shocking, I know.
After the board was cut, I checked that it fit into the frame. Then covered it with batting and two layers of burlap:
Then, I tried to fit it into the frame again and wouldn't you know, it was too big. Too big by literally an eighth of an inch. Maybe. I don't actually have any concept of how big an eighth of an inch is (maybe that's my problem to begin with?), so it may have been bigger or smaller than that. In any event, it was an incredibly miniscule amount. So, we tried to hammer it into the frame. Which only served to crack the frame. So then we had to apply wood glue to the cracked parts of the frame and clamp that together. Then, those clamps caused a corner of the frame to pop apart. Cue more wood glue and more clamps.
Once the frame was stable again, Dan and I tried cutting down the wooden piece to fit inside the frame. We only needed the teeniest bit removed. Basically like the width of the saw blade. Unfortunately, you can't cut wood that close to the edge, because it will splinter. So, we had to cut a bit lower and guess what? The board was slightly too small. Sigh.
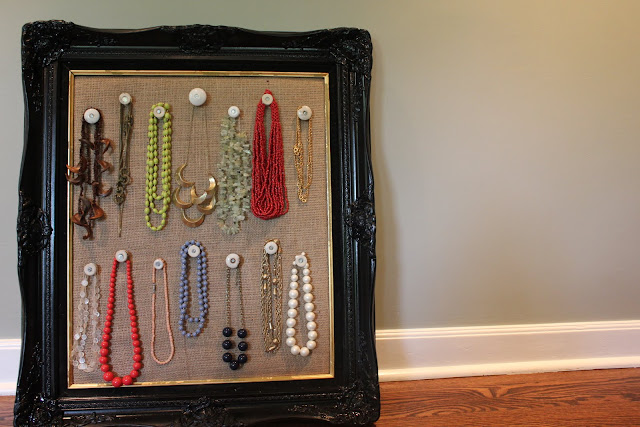
Today, I decided to throw perfection to the wind (eek!) and continue on with the board as is. It ended up working out quite well and if you didn't know any better, I think you'd be hard pressed to realize the sawing/measuring mishaps. I stapled the fabric back onto the board, which Dan's mom and I then attached to the frame. Dan helped me nail on these porcelain knobs that I bought at an antiques store in Missouri. And here is the final product:
Now all I have to do is hang it on the wall!


That is SO cool! I'm really impressed. Will you make me one? You could sell those. Really nicely done. Will you make me one? I'm serious.
ReplyDeletegosh dinah, i'm soooo busy these days, but i guess i can squeeze you into my schedule. jk. of course, i will make you one! we'll discuss specifics via gmail.
ReplyDeleteBeautifully done. You can teach people how to make these when they come to our craft retreat.
ReplyDelete