Showing posts with label diy. Show all posts

Wednesday, October 5, 2011

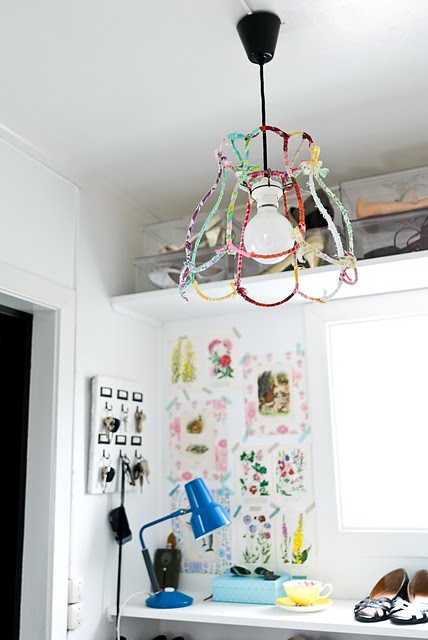
diy lamp


Since my return from Sweden/Denmark, my love of Scandinavian design has gone into overdrive.  I can't get enough of this stuff.  Of course, reminiscing isn't enough.  I had to go and find new blogs to adore.  One of my favorites, Fjeldborg,  featured this cool diy "lampshade."  I am using that term loosely here, as clearly there is not much shade going on.  Simply scraps of fabric wrapped around an old lampshade frame.  Of course to succeed at this project, you have to find a frame with a cool shape and you need scraps of fabric and I have neither.  Some day though.  The only thing I would change? Swap out that regular bulb for the Edison version.

Thursday, September 15, 2011

Tuesday, August 9, 2011

friends forever

Does the title of this post make anyone else start singing the song from Saved by the Bell?  Maybe Zack and Kelly would be my friends forever if I gave them one of these bracelets? Hmm...or maybe Zack and Kelly are fictional characters from the early '90s and I need to grow up.

All summer I have been making friendship bracelets.  In case you hadn't noticed, I like the multi-bracelet trend.  I usually enhance the friendship bracelets with some fancier bracelets, so I don't feel too much like a 9-year old.


some of my recent friendship bracelet creations
I learned how to make these bracelets from Honestly...WTF a great blog with amazing DIYs.  I put together my own tutorial (below), but you can check theirs out too right here.  The tutorial I made is for the chevron patterned bracelets - they're surprisingly easy to make!  (I start explaining what to do while I'm halfway through the bracelet, just because it's easier to see what I'm doing at that point.  At the beginning, it can be kind of hard to tell where the strings are, but after a few rounds through, the strings stay in place pretty well.)

1.  Cut an even number of strings to about 26 inches each.  The more strings you cut, the wider your bracelet will be.  If you want the color of the stripes to line up (like in the first and last bracelet pictured above) you need to have the same number of each color.  If you don't care if they line up (like in the middle one), you can have any number of any color keeping in mind that you still need an even number of strings in total.

2.  Gather all of the strings and tie a knot about 5 inches down from one end.  

3.  Attach the strings to something solid.  A lot of people will pin the knot to a pillow.  You could also tape the knot to a piece of cardboard.  I like using a clipboard, because it is easy to clip, unclip and change where the tension lies on the bracelet.

4.  Divide the strings into two equal groups (see below).  Again, keep in mind that if you want the colors of the stripes to line up, you need to have the same colors in both groups and arrange them so they are mirror images of each other.


4. Take the string on the far left side.  Fold it over the string to its right, forming the number 4.  The image below is a few knots in, so it's easier to see how the white string goes over the green string, forming the number 4. 


5.  Take the white string back under the green string and through the hole in the 4.  Pull up to the top to form a tight knot.


6.  Knot twice over each string in Group 1, until the white string reaches the middle of the two groups.

7.  Do the mirror image to Group 2.  Take the string on the far right, in this case one of the white strings and knot it twice over the string to its left working your way inwards.  This time the string will look more like the letter "P."


8.  Pull the white string through the hole in the "P" and pull up to form a knot.


9.  Continue knotting twice over each string through Group 2 until the two white strings meet in the middle.


10.  Knot the white strings over each other.  I don't think it really matters which way you knot them.  I generally see which one is longer and use that one to knot.

11.  Continue knotting from the outside string in for both groups of string until you have about 5 inches of string left. 

12.  Tie all of the strings into a large knot.

13.  Braid both ends and make another large knot at the end of each braid (see the first picture).

14.  Tie the bracelets onto your wrist!


See! There's nothing to it!  If you still don't feel up to making a bracelet yourself, leave a comment below and I would be happy to make one for you.  Just let me know which colors you'd like! 

Saturday, July 30, 2011

channeling my inner jenna lyons


The other day I channeled my inner-Jenna Lyons, played J.Crew creative director for an afternoon, and got to work re-inventing a big faux pearl choker from an estate sale. 


This was the easiest thing in the world to make!  And doesn't it remind you of something you might buy at J.Crew? All I did was tie a knot of ribbon over the clasp at one end of the necklace and wrap the ribbon around the loop on the other end.  I also tied a few knots haphazardly throughout the ribbon to make the necklace the right length.  I might embellish it a bit more at some point - maybe add some gold beads on either side of the knots in the ribbon or perhaps a brooch or fabric flower, but for right now, I think it's pretty nice!

Friday, July 8, 2011

jewelry frame

Remember when I talked about how I wanted to make something to organize my jewelry? And I showed you my inspiration?  Well, guess what?  After a lot of work, mistakes, and decision making, it's finally done!  Seriously, this project was not for the faint of heart and made me feel like a real DIY amateur, but now that I've completed it, I've learned from my mistakes and I'm sure it will be much easier the next time around.

I decided to take an old picture frame and repurpose it for jewelry. I purchased this one relatively cheaply at an antiques store:


While the gold frame didn't look bad per se, to have this be a re-hab project, I needed to do something to it.  Plus, I had never (brace yourselves) used spray paint before and was excited to try it out.  Here's a little gray primer...


...followed by black and a glossy top coat.  I am now a spray paint addict - I love the beautiful results, not the fumes, so don't go all Intervention on me. Ugh I wish I had discovered this stuff when I was working on the Good House!


Then, the most challenging part! I had to cut a board from Dan's parents' garage to fit inside the frame.  This was also my first time using a handheld saw like this! I was so nervous, I was sweating profusely.  And while I probably should have been focusing on the task at hand, I could only think about if the sweat caused my hands to slip, therefore chopping off my arm, or worse yet, chopping off Dan's dad's arm (pictured - he held the board steady for me and kept reminding me to follow the line).  I mean, what better way to express my gratitude for them letting me live here? Luckily, none of the aforementioned disasters actually happened.  Shocking, I know.


After the board was cut, I checked that it fit into the frame.  Then covered it with batting and two layers of burlap:


Then, I tried to fit it into the frame again and wouldn't you know, it was too big.  Too big by literally an eighth of an inch. Maybe.  I don't actually have any concept of how big an eighth of an inch is (maybe that's my problem to begin with?), so it may have been bigger or smaller than that.  In any event, it was an incredibly miniscule amount.  So, we tried to hammer it into the frame.  Which only served to crack the frame.  So then we had to apply wood glue to the cracked parts of the frame and clamp that together.  Then, those clamps caused a corner of the frame to pop apart.  Cue more wood glue and more clamps.  

Once the frame was stable again, Dan and I tried cutting down the wooden piece to fit inside the frame.  We only needed the teeniest bit removed.  Basically like the width of the saw blade.  Unfortunately, you can't cut wood that close to the edge, because it will splinter.  So, we had to cut a bit lower and guess what? The board was slightly too small.  Sigh.

Today, I decided to throw perfection to the wind (eek!) and continue on with the board as is.  It ended up working out quite well and if you didn't know any better, I think you'd be hard pressed to realize the sawing/measuring mishaps.  I stapled the fabric back onto the board, which Dan's mom and I then attached to the frame. Dan helped me nail on these porcelain knobs that I bought at an antiques store in Missouri. And here is the final product: 


Now all I have to do is hang it on the wall!

Wednesday, June 29, 2011

jewelry board inspiration

As I noted on my latest to-do list (Wow, that was awhile ago! Is it okay to make another to-do list before you've finished even started your other one?) I want to make a jewelry organizer.  Here are some images I've collected on pinterest to inspire me:


Actually, I have already started my board, just a few beginner mishaps have set me back a bit.  It should be done soon and I'll be sure to share it with you when it is.  I will be so happy when my necklaces are no longer stuffed in Christmas gift bags repurposed as jewelry boxes.  Ho, ho, ho no more! 

all images found on pinterest

Monday, June 20, 2011

kraft (not the mac and cheese kind)

Not too long ago, if you brought up Kraft, I would have thought of the stuff from the blue box.  But say it today, and a different image will come to my mind - that of a beautifully wrapped present.  I am currently so enamored with kraft paper that I am trying to come up with a way to justify buying and wrapping (!) lots and lots of gifts.

1.

 2.

3.


Kraft paper is all natural and 100% biodegradable, aka you can compost it.  And it's pretty inexpensive.  So you can feel good about buying it and your bank account will like it too.  Who wants a present*?

*Disclaimer: Said "present" might just be an empty box wrapped in kraft paper.


image sources 1, 2, 3